It can be very frustrating when you attempt to upload a picture Compressing Images to 100KB only to realise that the picture is of a larger size than required. Compressing Images to 100KB Without Losing Quality The good news is that you can shrink down pictures to 100 KB.
Home
Summary
- Learn what lossy and lossless methods of compression mean.
- Be able to choose the proper application for images resize on various devices.
- Know the steps to ensure best compression.
- Efficiently combine quality and file size.
- Don’t make easy errors such as applying too much compression or mixing up formats.
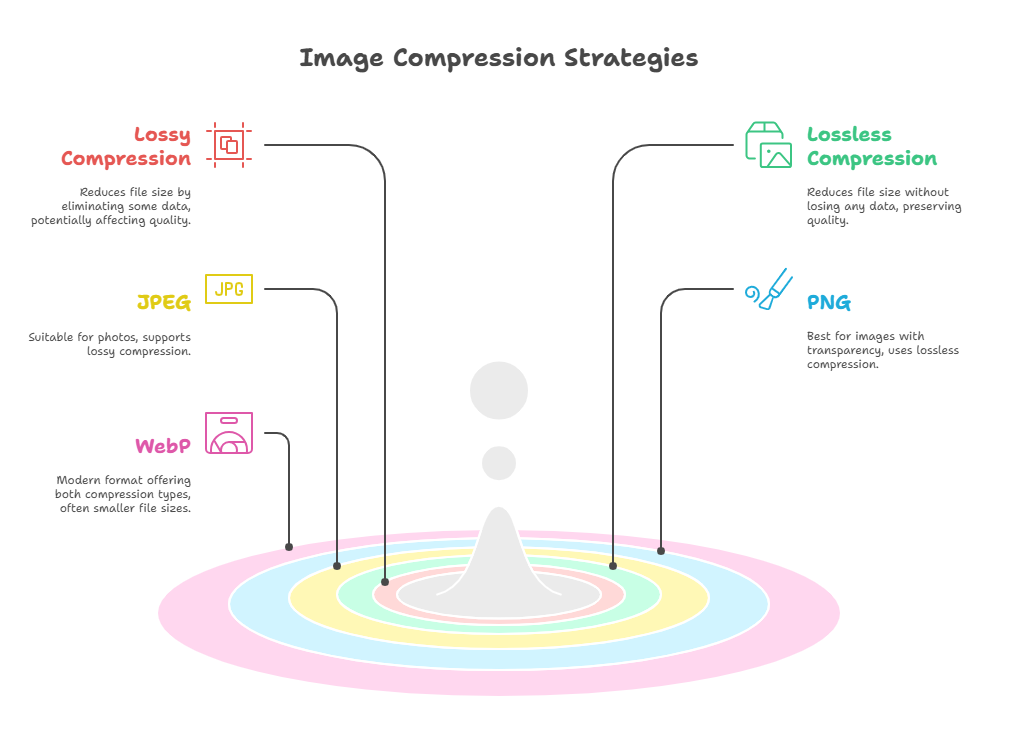
Types of Image Compression Techniques Images to 100KB
There are two primary methods of image compression: lossy and lossless. The best feature of lossless compression is that all your data remains undisturbed. This allows the picture to lose pixels but still provides higher quality for the user. This is especially beneficial for people who work with graphics often. On the other hand, images go through a more destructive process in lossy compression where some data are removed even before they get to the picture.
This approach works well in settings with tight budgets, and where some degree of compromise is doable.
The images look as good as they did before the compression and are shiftier for storage purposes. This is perfect for camera users or anyone in graphics who would like to retain quality. Meanwhile, web photos tend to use lossy compression. This technique reduces file size by omitting details that go unnoticed. It is commonly used where speed and space are an issue.
The Fundamentals of Compression AlgorithmsImages to 100KB
The algorithms that compress images work internally to gather data and delete any unnecessary duplicates, thus recycling images. Some lossless compression algorithms, such as PNG and GIF for example, use run-length encoding, while JPEG is the top performer when dealing with lossy compression, as it disposes of any unwanted image data. Other techniques such as cosine transform are also incorporated for a best case scenario.
Illustration Table:
| Compression Type | Algorithms Used | Data Loss |
|---|---|---|
| Lossless | PNG, GIF | No |
| Lossy | JPEG, MP3 | Yes |
Determining the Most Suitable Compression Strategy
There is a distinct difference between lossy and lossless compression techniques, and defining which one to use mostly depends on one’s requirements.
For images where every detail is significant, lossless is the term you should use. It is great for images that require a lot of editing or need to be printed in high quality. However, lossless compression is not advisable for images being uploaded on a website where speed is a priority.
Keep the following in mind during decision-making:
- Size or Quality: Is size or quality more important to you?
- Web or print: Is the image going to be used on the web or printed?
- How often is it edited?: How frequently is the image being edited after it has been created?
It’s a long act of balancing quality, image, and file size. Images to 100KB Every detail of the image must be given attention because once the lossy approach is taken, there is indeed no other way to revert.
Software and Tools for Compressing Images
Best online image compressing tools
Quite simply, online tools are lifesavers. Arguably superior to other forms, Images to 100KB they are easy to use and are available free of cost, which makes them instantly popular. Here are the strongest:
- Optimizilla: With its simple yet sophisticated intuitive interface, it is loved the most for melding smart lossy compression technology with the needs of consumers. You can upload pictures up to 20 in one go, adjust the compression level for every photo, and download them within a blink of an eye. It’s a great option for people looking to satisfy their needs without putting in much effort.
- TinyPNG: It is straightforward, so no one needs difficult instructions to understand it. Using complex algorithms, TinyPNG reduces the colours within the image for compression. The method works and the results are of a reasonable grade.
- Compress JPEG: Another simple tool that is specifically for JPEG images. You have to drag and drop your images and the tool will automatically do the rest of the work.
Software For Desktop Users
If you just want a program installed on your computer, there are some nice desktop programmes out there. Online image compressors may lack control and flexibility; their desktop counterparts tend to be more powerful.
- Adobe Photoshop: The unquestioned leader in image editing. While saving the file in JPEG format, it enables you to select the level of quality (compression setting) you wish to apply. You just have to select the format, and the app gives you the size of the file.
- GIMP: A free version of Photoshop. GIMP has powerful tools without the cost. It is perfect for individuals who want more professional control.
- Image Optima : A well-liked app among Mac users that is reputable for compressing images with hardly any loss in quality owing to its user-friendly interface and highly efficient algorithms.
Mobile Solutions for Fast Compression
Many people wish to minimise images on the move, and with people taking more pictures these days, Images to 100KB having the ability to do so through mobile devices has become incredibly useful. Here are a few ready-to-use apps to help you manage your images better:
- Photo Compress 2.0: An app that allows you to reduce your photos’ sizes from the mobile device itself, no laptop or PC needed, highly convenient.
- Image Size: A highly flexible app that will also adjust and resize images for better storage.
- Reduce Photo Size: This app, as is evident from the name, is designed to effortlessly minimise your pictures.
We would like to advise that: If it is an app or an online website or even software that is installed on the desktop, there is no tool that will suit everyone’s workflow. Many times the best solution may lie in the use of these tools in unison.
Working with Online Tools to Compress Images
For those who wish to avoid the hassle of software installations, there are online tools that are both effective and easy to use. Here’s how:
- Select a good online compressor: There are popular websites such as Tiny PNG or Compress JPEG that are reliable choices.
- Put in your image: You can simply drag and drop your image on most of these tools’ websites.
- Set compression: Some gadgets allow you to set the compression level.
- Download: Prior to saving, ensure that the file is compressed.
Techniques to Manually Compress Images
Hands-on methods always yield commendable results. Images to 100KB As such:
- Reduce Quality of Image: Software like Photoshop tempts you with the option to change images quality from 100% to 80% hoping to reap rewards in file size without heavy distortions.
- Limit Colours Used: For simple designs, lowering the colour depth from 24-bit to 8-bit can drastically lower size.
- Change Formats: Switching PNG images to JPEG helps reduce file size as long as there is no transparency.
Maintaining quality without enlarging the size remains crucial. Don’t lose hope if your images load slowly because it will take some effort to find out how to make them load faster without losing their quality.
Achieving a Good Balance Between Quality And File Size
Comprehending Compression Ratios
With regards to reducing the size of images, the ratio of compression is an important factor to consider. Images to 100KB It corresponds to the initial size of the file and the size after compression. For example, if you start with a file that is 10 megabytes and after you reduce it by 2 megabytes, the ratio of compression is 5:1. This indicates that the file is 5 times smaller than the original. Very important at this stage is what I must achieve so that the detail wastage will be minimal.
How to Reduce Loss of Quality
- Select the Appropriate Format: The JPEG compression format is best used when dealing with photographs because it captures the minute details and balances the size.
- Change Compression Levels: Alter the level of compression. There are numerous editing tools that allow you to change the level of compression. A low to moderate level usually yields the best results.
- Look Over the Results: After compressing the image, always make sure that the quality suffices. If it does not meet expectations, then settings should be altered.
When should you utilise lossy and lossless compression
- Lossy compression: is the recommended type for use in web pages. It helps to save on costs without compromising much on quality. This technique works great for images that have elements of illustrations for blog posts or social media posts.
- Lossless Compression: Ideal for professional photography or creating portfolios where quality matters the most.
JPEG compression balance between image quality and file size is truly an art. People often want images to load quickly, but still hope for good quality. For JPEG compression, a good image will always take time to load, so finding the right balance is what matters the most.
The Role of Image Compression in SEO and Performance

Impact on Website Load Times
First thing first, images that are compressed will take up less space, which leads to faster loading times. This procedure is a must since everyone wants fast load times and if a site is slow, people will leave it which is not good for business. By compressing images, you are eventually optimising your site for speed performance which makes visitors happier and boosts their confidence in your website, possibly making them stick around more.
SEO Benefits of Optimised Images
SEO also benefits a lot from optimised images on your site. Google and other search engines usually regard and factor in the loading speed of a page when ranking websites; thus, compressed images can enhance the speed of your page. Images to 100KB This boosts your chances of ranking higher on search results, which can lead to increased user traffic on your website. In addition, applying the appropriate Image SEO strategies gives your site the potential to have your pictures displayed in image searches, which can broaden your audience even more.
The Middle Path: Design and Load Speed
You are surely familiar with the saying, ‘a picture is worth a thousand words,’ but pictures can be more than just beautiful and tell great stories. Images can also invite people to linger over the pages of a site and ideally help speed up loading time.
The proper image of a site must always be balanced with the proper load speed, which is essential in creating a faster website. A proper middle ground must be established for great looking images that load quickly. Bad quality images are a side effect of these awesome decisions, which is acceptable, but blurry pictures are a different story altogether. The ultimate goal is to arrive at a proper middle ground that promotes both great quality images and quick load speed.
Common Mistakes and How to Get a Grip on Them
Avoiding Over-Compression
It is almost comical how in a bid to compress image sizes, you just might end up losing everything. Over-compression can easily mess up your amazing images and leave them looking like pixelated disasters. As a rule of thumb, try and monitor how your image looks as you are compressing it.
These tools always come with a useful feature that allows images to be compared side by side to check and assess quality loss. It is better to sacrifice a few kilobytes of file space instead of sacrificing quality to compression, as achieving compression to save space but retaining quality is more beneficial in the end.
Overlooking Variances in Image Formats
Different image formats offer different features. For instance, JPEGs work brilliantly for photographs, Images to 100KB while PNGs do better with images that have text or need a transparent background. Choosing the wrong format can easily lead to larger file sizes or a loss of image quality.
Learning the strengths and weaknesses of the different formats can help in making a more appropriate choice.
Neglecting to Backup Originals
After compressing an image, it is hard if not impossible to revert back to the original image. Because of this, it is crucial to never delete the original image as it acts as a guide for future use. Every image that is uncompressed should be saved to a new folder so that there is a chance of achieving the desired end result through recompression.
In the compression world, less is not equal to more. It is all about attaining a balance between size and quality.
Avoiding simple mistakes can greatly ensure that the images look better while enhancing the unparalleled retouching detail in product photography.
Working Magic With Professional Aesthetic Details
Batch Processing For Higher Productivity
When striving for high productivity with the help of a couple of images, batch processing is a clincher. You can perform batch image compression rather than selecting individual images. This is incredibly time-efficient while also maintaining uniformity in all your files. Here is how to perform the task:
- Look for appropriate software: Search for tools capable of multitasking such as XNConvert, which has the ability to apply both lossy and lossless compression.
- Compile your images: Make the organisation of similar images so that the process flows impeccably.
- Tailor your settings: Determine how high you will set the images as a whole in the batch one.
Adopting AI for enhancing images
Artificial intelligence has taken the term image quality to another level. Images to 100KB AI tools adjust the complexity of images by modifying the brightness, changing the essence of the image, and allowing for additional minor adjustments. After the compression stage, this could prove to be useful when the image lacks quality. Bear this in mind:
- AI can improve elements that may be saved during compression.
- AI can adjust the settings per the image’s context.
- This allows for automated suggestions for the tools to enhance the image quality.
Future Trends in Image Compression
Wrapping It Up
The prospect of compressing images to a mere 100KB without any quality deterioration might seem challenging, but when equipped with the right tools, it can be achieved. With the help of our guides, you are always able to remain one step ahead. We’ve gone through the basics, examined the different ways, as well as the advantages and disadvantages regarding lossy compression and lossless compression.
Always remember that the aim is to determine the optimum balance in what is required to meet your needs while ensuring that the images do not take much space. Images to 100KB Whether you are improving a website or simply trying to clear some space on your phone, these suggestions will come in handy. Put them into practice and observe the vast difference that comes into your digital life. Happy compressing!
Read more >>>>>>> Step-by-Step Guide to image compressor to 20kb
Frequently Asked Questions
What is image compression?
Image compression is simply the process of adjusting the size of an image file so that it takes up less space. Such changes are accomplished by deleting irrelevant parts of the image that are futile while keeping the photograph presentable.
Why should I compress images?
Images that have been slightly altered can load with much greater speed on web pages, as well as consume less space in Google storage. This is very useful for speeding up webpages and gaining extra room on other devices.
What’s the difference between lossy and lossless compression?
Quality may be affected due to the information being sacrificed; that is how lossy compression ensures that the file usage is limited. It is possible to maintain quality while losing some detail during compression; however, lossless compression keeps everything in perfect condition and is thus limited in its ability to shrink files.
What is the best way to compress a photo to 100KB?
There exist tools that can help you in compressing images like online tools, apps, or software, that allow you to change the size as well as quality. This way, they can help you ensure that the final image is less than 100KB without compromising too much quality.
How does image compression impact the quality?
It is possible that when an image is compressed some alteration can be seen. There exist two types of compression – lossy and lossless; while lossy alters the details of the image, there is no change to quality with lossless.
How can compression impact SEO?
Images that have gone through compression load at a much faster rate which enhances the overall performance of the website. Because of the faster performance, websites are likely to rank much higher on the search engine.
Home